
INKs and Stencils on Chocolate Clays
Amaco INK's on Milk Chocolate and Dark Chocolate Clays, fired to Cone 5.
Amaco’s Ceramic Printing INKs are such a fun and exciting way to easily add bold graphics to your clay creations! Not only can you use the INKs with silkscreens, but you can also create some wonderful surfaces utilizing stencils as well! Here are a few techniques to take your design work to the next level.
Graphic Tiles
These tiles were created using Amaco INKs in combination with stencils and silkscreens on soft leather hard clay (Amaco’s Milk and Dark Chocolate Clays). The rich, dark colors of the clays allow for a strong contrast with the INKs, helping them to pop more!
Create Unique INKs colors!
Instead of using the INK colors directly out of the container, we mixed our own colors to create a pale pink and an orangey yellow. All of Amaco’s INKs are completely intermixable! The pink color was created by mixing a little bit of Bright Red INK with some White INK. The orangey yellow color was created by mixing a little bit of Bright Orange INK with the Deep Yellow INK. Always add the darker color to the lighter color a little at a time until you get the color you are after. Oh, and also be sure to mix up more than enough for your project to ensure the color is consistent throughout.
INKS + STENCILS
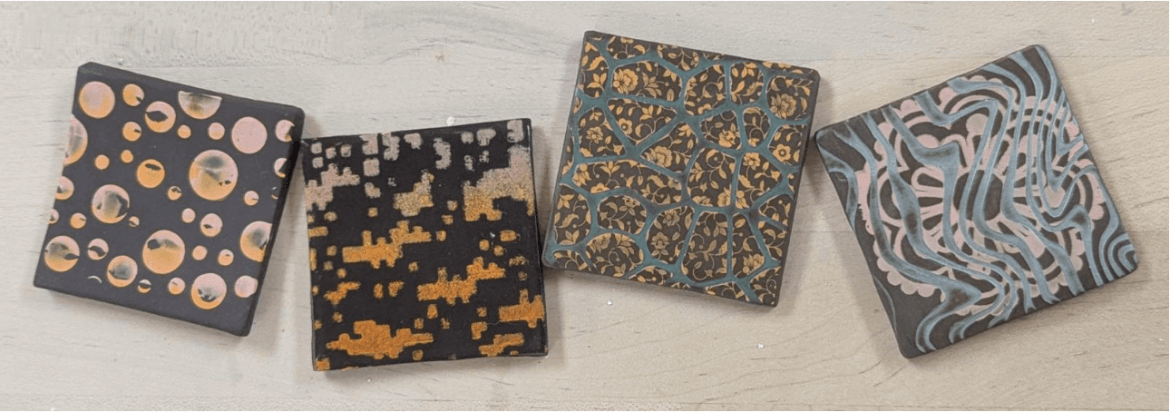
The Bubbles Tile (Dark Chocolate Clay)
Set the bubble stencil on top of the soft leather hard clay tile. Using a rubber rib, smear the first color one direction on the stencil so that it accumulates only on one side of the bubbles. Repeat the same process using the second color but going the opposite direction. This will give the bubbles that dual colored look. This tile was bisque fired and later fired to cone 5 with no glaze.
The Pixelated Tile (Dark Chocolate Clay)
Select your stencil pattern and set it on your tile. In order to create the gradation, we used 3 different colors: Pink (Mixed), Deep Yellow, and Bright Orange. I used a small stamping sponge to apply the INKs one at a time, going back and forth between the colors to help them blend where they meet. Carefully remove the stencil straight up to avoid smudging the design. This tile was bisque fired and then later fired to cone 5 with Amaco’s Zinc Free Clear.
INKS + STENCILS + SILKSCREENS
The Floral Tiles (Milk Chocolate Clay)
Select and set a patterned stencil on top of your clay tile. Using a pony roller, press the stencil into the clay until the clay is even with the top of the stencil. This will allow the screened image to only adhere to the raised areas. Next lay the floral silkscreen on top and use a rubber rib (or your finger) to smear the INK across the screen. Once the image has been successfully transferred to the clay, peel back the silkscreen and the stencil to reveal the final design. These tiles were bisque fired and then had one of Amaco’s Satin Matte glaze applied and wiped back with a damp sponge, so it remained only within the indented areas left behind from the stencil. They were then fired to cone 5 with no additional glazes.
To find Amaco INK's, inquire at your local distributor or order from our website.
If you make something using Amaco INKs, tag us on social media!
#amacobrent #howiamaco #AmacoINKs
Thank you for joining us on our glazing adventures. See more here
Happy glazing!