Majolica Renaissance

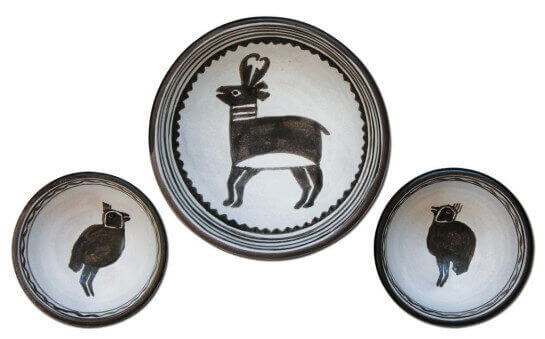
Majolica is the historical term used to describe a decorative ceramic technique of painting with glaze materials on top of an opaque, tin-based white glaze. It is a process that was first developed in the Middle East to imitate Chinese Porcelain. It was brought across Gibraltar into Spain by the Moors. Spanish potters then began making Muslim-inspired works in this method. Italians imported this ware from the Spanish port of Majorca, calling it maiolica ware. When the French imported it from the Italian city of Faenza, they called it faience. Delft pottery also employs the same technique as Majolica (Maiolica), and is most often represented by blue brushwork on a white background. Traditionally, the Majolica process involved completely coating terra cotta clay, or red-ware in an opaque white glaze, then painting on top of that unfired glaze with decorative stains and oxides. AMACO’s low-fire Teacher’s Palette glazes allow you to mimic this historic technique with ease and success in the classroom over any low-fire earthenware clay.
Supplies List
- AMACO Teacher's Palette Glazes
- AMACO Velvet Underglaze V-361 Jet Black
- AMACO Underglaze Pencil
- AMACO Underglaze Applicator, 18 gauge
- AMACO 6"x6" Bisque Tile
- AMACO Plastic Banding Wheel #700
- Assorted Glazing Brushes
- Sketchbook
- Drawing Materials
- Paper Plates or Paint Palettes
- Clear Plastic Container Lid
- Scissors
- Black Permanent Marker
- Rulers

Introduction and Sketch
Show students images of both historical Majolica wares and contemporary ceramic art using the Majolica process. Have students loosely sketch their desired symmetrical designs, and a mythical animal of their choice for the center of their tiles. They may create their own imaginary creature by combining two different animals together.
Clean Bisque and Label
Lightly wipe bisque surfaces with a clean damp sponge to remove any dust before glazing.
Write each student’s name on the back with underglaze by brush, an Applicator bottle or an AMACO® underglaze pencil.
Apply White Base Glaze
Glaze each tile with 2-3 even coats of TP-11 Cotton glaze (allow glaze to dry between coats).
Divide Tile Using Template
Use template (link basics lesson) to divide tile into quadrants and position circle.
Sketch Designs
Have students sketch their design onto the tile. All pencil marks will fire out. The inner circle can be a frame for the mythical animal.
Mix Colors
Use paper plates as a mixing palette. Have students select their color schemes by placing a dollop of each desired TP glaze color onto their plate.
Apply Background and Lighter Colors
Instruct students to start with the lighter and background colors first, and begin to fill in design.
Apply Outlines and Darker Colors
Use darker colors or outlines last.
Tip: Flowing Brushstrokes
Dilute colors with water on the palette to create longer, flowing brushstrokes.
Select Right Brush for Detail
Use an appropriate size brush.
Optional: Outlines with Underglaze
If desired, black underglaze may be painted last to create a matt outline or definition to the design. Use brush or an 18 gauge Underglaze Applicator containing the underglaze.
Glaze Firing
Completed tiles should be fired to cone 05 at medium speed.
Video
Similar Lesson Plans