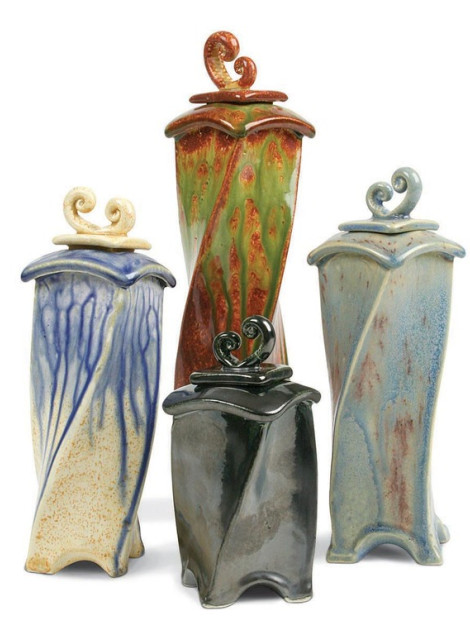
Twisted Vessels

Exploring Industrial Processes to Create Unique Extruded Vessels
An extruder is a machine which pushes or draws certain materials through a cross-sectional die to form specific shapes. Commonly extruded materials include metals, polymers, ceramic clays and food stuffs such as pasta. In ceramics, the use of extruders can be traced back to 1619 when an Englishman named John Etherington built the first hand-operated extruder for creating bricks. Extruders are still used today for the manufacturing of ceramic roof, wall and floor tiles, bricks and in the most basic form, for pugging, de-airing and forming clay into consistent blocks that fit into boxes for shipping!
Ceramic artists use extruders today for creating consistent coils, slab strips, test tiles, and irregular continuous shapes for hand-building complex forms. Artists using ceramic extruders in their studios include Diana Pancioli, Randy Johnston, and David Hendley. Each artist uses the simple extruding tool developed for industry to transform clay into personal and expressive forms.
Supplies List
- Versa Clay No.20 Moist
- Clay Extruder and Hollow Die Set
- Hardwood Thickness Strips
- Hardwood Rolling Pin
- Wire Clay Cutter
- Fettling Knife
- Glaze Brushes
- Low-Fire Glaze
- Sponges
- Hardwood Pony Roller
Set die in extruder
Load 2" square die, 1 1/2" interior die and spider into extruder end cap. Shape and load clay into extruder.
Extruder Die View
Extrude Clay
Pull down on the lever of the extruder with one hand, while twisting the clay as it exits the end cap with the other hand.
Cut and set up
Use wire cutter to slice extrusions at 6" to 12" intervals from the end cap. Stand cut extrusions on a table to dry until leather hard (about 1-2 hours) or wrap in plastic to use during next class period.
Slabs for Tops and Bottoms
Roll slabs for tops and bottoms of the vessels. Make slabs the same thickness as the walls of extruded pieces. Allow to dry until leather hard.
Cut Slabs
Cut one slab into 2" squares (bottom) and the other into 2 1/2" squares (top). Set aside. You will use one of each size for each vessel. Cover squares with plastic so they don’t get too dry.
Shape Top
Choose one of the extruded pieces and cut to size to square up the top and bottom ends. Carve the top into a slight arch.
Prepare Bottom
Score and slip the bottom edges and attach the bottom slab (one of the 2" x 2" squares).
Attach Base
Push bottom slab up into the arches with thumb.
Roll Base with Tool
Roll fettling knife handle along the edges to reinforce the seam. Trim any excess clay, then smooth the edge with a wet sponge.
Shape Bottom
Cut deep arches on the bottom sides so the four corners become the feet.
Attach Top
Round and smooth the corners of a 2 1/2" square with a wet sponge. Score and slip the top edges of the extruded piece, then add the slab to the jar. There should be a slight overhang.
Shape Top
Use the Pony Roller to roll lightly over the slab to make it tight and conform to the arch.
Cut Opening
Cut a 1" square out of the center.
Cut out Lids
For the lid, roll out clay 1/8" thick. Cut out 1" squares and 1 1/2" squares (one of each size needed per lid).
Construct Lid
When leather hard, slip and score one side of the 1" square center and attach it to the center of the 1 1/2" square.
Roll Coil For Handle
For the handle, roll a clay coil approximately 3" long tapered on the ends.
Make Coil into Handle
Pick up the coil and slap it down onto the table to create one flat side. Roll up each end of the coil, flat side up.
Attach Handle to Lid
Slip and score the center of the lid top and attach the coil handle. Use a pencil or pen to press the handle on firmly.
Finished Lid
Dry, Bisque, and Glaze
Allow pieces to dry completely, then bisque fire to a mature Cone 04.
Brush on 3 coats, tapering the third towards the base of the piece. If layering with Magic Flow glazes, apply two additional coats over the top third of the pot. Do not use Magic Flow glaze on the lids or inside of the piece as it runs/flows. Wipe all glaze off the feet so they will not stick to the kiln shelf. Glaze fire to Cone 05.
Note: Use Kiln Shelf Wash on your kiln shelves to prevent sticking. Do not fire with the lids on the vessels or they will stick together.


