Homemade tool for dipping pots

Instead of using hands or tongs, this homemade tool will enable great control when dipping your bisqued pieces.

Materials
Gather pvc piping, pvc elbow joints, hot glue gun, an old credit card, scissors, an Amaco plastic lid, sponges, and your imagination.
Dipping the piece
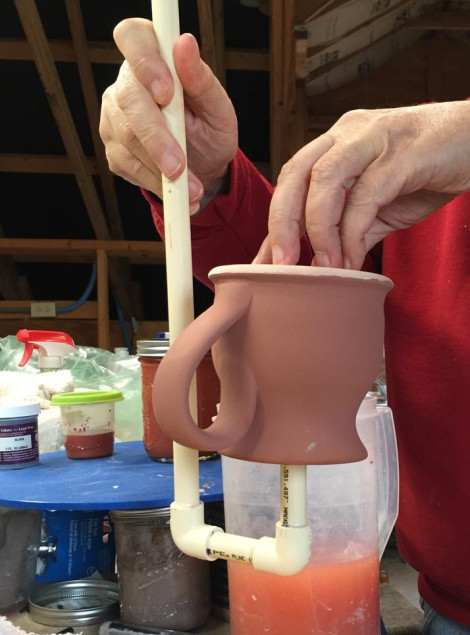
Into a sieved, well-mixed glaze bucket, insert the tool into your mug with sponge resting on the inside-bottom of your mug. Hold the mug upside down, with one hand hold the taller piece of pvc and the other hand on the outside bottom of your mug.....and dip. You won't have to wax the piece because you can tightly control the depth to which you dip your piece!
Making the tool
- Decide what type of pottery you will be using the tool - this tool illustrated is my "first generation," designed for narrow necked mugs.
- Cut the pvc tubing - measurements to vary as you chose, the illustrated tool has one tube length so approximately 10 inches, one about four inches, and the third one about eight inches.
- Join the three pieces with 90 degree pvc joints and pvc glue, like a "j". See the photo.
- With scissors, cut the old credit card into a circle shape small enough to go through the opening of your mug.
- Using hot glue, glue the credit card circle to the top of the shorter leg of the "j".
- Cut your sponge to the size of the credit card circle and, using hot glue, affix the sponge to the credit card.
- Let everything cool/solidify. You're ready to use the tool.
Variations
The tool uses are limited only by your imagination. For bowls or other larger pieces, you can substitute a forty-five degree elbow or a longer "middle" piece to enable you to dip larger pieces. You can use a plastic lid and hot glue a whole sponge for greater strength to control large pieces. This is a concept. I'm sure you will all create improvements and modifications to fit your needs. Pass it forward and share your ideas with us! Best wishes to all!


