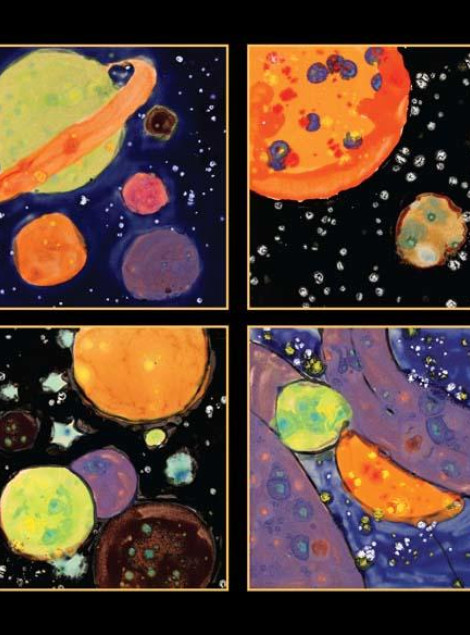
Celestial Tiles

The stars in the night sky have been the subject of eternal contemplation, poetry and research. They have provided inspiration for science, film-making and art for several centuries, and the study of Astronomy continues to amaze us with new discoveries! This is an exciting cross-curricular project involving the study and research of planets, moons, stars and solar systems. What better way to represent Celestial forms and colors on clay than with AMACO® Crystaltex glazes that fire naturally to create starbursts of color?
Supplies List
- Ceramic Bisque Tiles
- Class Pack: (CTL) Crystaltex No. 4
- CTL-22 Milky Way
- CTL-1 Jet Moss
- CTL-3 Lava
- CTL-23 Moody Blues
- TP-1 Coal Black
- Underglaze Applicator
- Fitch Fan
- Wax Resist
- White Art Clay No.25
Lesson Plan Goals and Objectives
- Students will study Astronomy, investigating why the planets in our solar system are different colors, whether they have solid, liquid or gaseous surfaces, and their relative scale to our planet, Earth.
- Students will explore composition and the spatial relationships of forms through the use of color.
- Students will investigate and visualize how glazes alter in appearance before and after firing.
This lesson is ideal for grades 3-8.
National Visual Arts Standards
- Making connections between visual arts and other disciplines
- Content Standard Understanding and applying media, techniques, and processes
- Using knowledge of structures and functions
- Choosing and evaluating a range of subject matter, symbols, and ideas
Introduction
Introduce the project and assign the desired level of research and sketching. Students could collectively create one large mural, or each paint their own design.
Sketch
Sketch the basic designs onto bisque tiles using a regular graphite pencil. If starting with moist clay, sketch on paper before translating onto clay.
Apply Lines
Use an underglaze applicator bottle filled with AMACO® Teacher‘s Palette TP-1 Coal Black to draw over the pencil lines. This will help separate the various glaze colors. Lines should be about 1/16"–1/8" wide. Let dry.
Fill In Glaze
Fill in the circles with the desired AMACO® Crystaltex glaze colors. Brush on 2-3 coats of glaze for full coverage, or if a small area, one “pooled” application may be sufficient.
NOTE: Mix the CTL glazes well before use to disperse the crystal chunks which normally settle to the bottom.
Night Sky
Fill in the night sky or background with the desired glaze color. The following glaze colors are recommended for the night sky / background and should also be available: CTL-22 Milky Way, CTL-1 Jet Moss, CTL-23 Moody Blue, and CTL-3 Lava
Optional: Wax Resist may be used to cover glazed planet shapes before applying the background color.
Place Crystals
The crystal chunks within the CTL glaze may also be placed specifically where desired for controlled color bursts.
Fire tiles flat
Fire to Cone 05. Fire tiles flat so the colors will not flow together .
Project Variations
- Use Stickers: Adhesive circles or stickers cut in the shapes of the desired planets and stars may be placed on the bisque tile before any glazing is done. The “background” would then be painted and allowed to dry before removing the stickers and filling in the other colors.
- Sculpt Wet Clay: If more than one class period is available, this assignment could be executed in 3D or in relief by using moist clay then modeling and sculpting the planet shapes and textures (use AMACO® 25M White Art Clay). Upon bisque- firing to cone 04, the pieces would be glazed as indicate above with Crystaltex glazes and re- fired to cone 05.
Similar Lesson Plans